Note: the actual file name that will be sent to you will be different from what was used here. For example, when installing the database i used filename but the file sent to you will be different.
This tutorial will be divided into two parts
Part 1
Downloading the program.
Installing Internet Information Service (IIS).
Installing the programs.
Installing the database.
Part 2
Running the program/website subsequently.
Burning the program to a CD.
Part 1
1: Downloading the program
Step 1: In your email, you will find three links. Click the first link, you will be directed to a web page. When the page finishes loading, at the top, you will see an arrow pointing downwards, click on it to begin the download. Check the progress of the download by pressing CTRL + J on your keyboard.
When the download finishes, copy the downloaded file (Your name package) to your documents folder.
Step 2: If you don't have winrar software installed. Go back to your email, click on the second link, you will be directed to a web page. When the page finishes loading, at the top, you will see an arrow pointing downwards, click on it to download. Check the progress of your download by pressing CTRL + J on your keyboard.
When the download finishes, copy the downloaded file (wrar393) to your documents folder.
Step 3: Select the appropriate version of software for your computer and click on it, you will be directed to a web page. When the page finishes loading, at the top, you will see an arrow pointing downwards, click on it to begin the download. Check the progress of the download by pressing CTRL + J on your keyboard.
When the download finishes, copy the downloaded file to your documents folder
2. Installing Internet Information Service (IIS).
On windows 7
Step 1: Click Start and then click Control Panel.
Step 2: In Control Panel, click Programs and Features and then click Turn Windows features on or off.
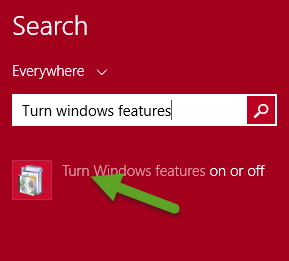
On windows 8 and above, search for Turn Windows features on or off
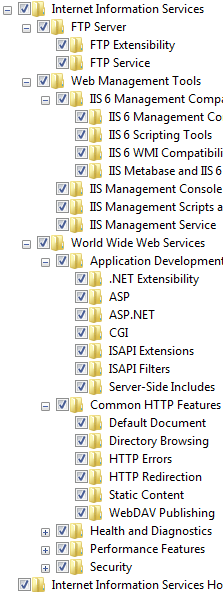
Step 3: In the Windows Features dialog box, click and expand the Internet Information Services tree node, check all the options beneath it, then click OK.
After clicking OK, a dialog will appear on your screen for a while.
When its done, launch your web browser and type http://localhost.
3. Installing the programs
Go to your documents folder where you just copied the three downloaded files, double-click on the files to install it.
4. Installing the database
Step 1: Copy the filename.bak to Drive C.
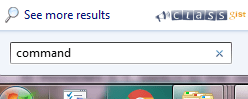
Step 2: Start Command Prompt as an Administrator
On windows 7, search for command
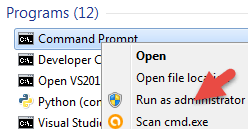
On windows 8 and above, search for Command prompt, right-click on it and click Run as administrator
Step 3: In the Command prompt window, type the following: (Note: filename should be changed to what you copied to your Drive C)
Sqlcmd -E -S .\SQLEXPRESS -Q "create database filename" then hit enter on your keyboard, on the next line type
Sqlcmd -E -S .\SQLEXPRESS -Q "RESTORE DATABASE filename FROM DISK='C:\filename.bak' WITH REPLACE" then hit enter on your keyboard, on the next line type
sqlcmd -S .\SQLEXPRESS then hit enter on your keyboard, on the next line type
1> USE filename; then hit enter on your keyboard, on the next line type
2> go then hit enter on your keyboard
it will display changed database context to 'filename' on the next line type
1> CREATE USER [IIS APPPOOL\DefaultAppPooL] FOR LOGIN [IIS APPPOOL\DefaultAppPooL]; then hit enter on your keyboard, on the next line type
2> go then hit enter on your keyboard, on the next line type
1>GRANT CONTROL TO [IIS APPPOOL\DefaultAppPooL]; then hit enter on your keyboard, on the next line type
2>go hit enter on your keyboard
Now, to run your program, launch your web browser and type the website link in your email.