Once you are familiar with how to install WordPress, it's time to start customizing the website. This tutorial covers the following topics/posts which make up the complete website. Each topic/post is a continuation of the previous posts. The topics are listed below:
1. Customizing your WordPress site
2. Change the Theme Option Settings
3. Working with the media library
4. Adding home page and blog page to a WordPress website
5. Customizing the home page
6. Creating rows/sections for adding widgets on the home page
7. Create the Call to action row/section
8. Create the Latest/recent blog post row/section
9. Create another Call to action row/section
10. Create the social media widget row/section
11. Create the About Us Page
12. Create the Employees Page
13. Create the portfolio/image gallery page
14. Create the Contact us page
15. Create the Testimonial/Success Story page
16. Create Blog Posts
17. Enable comments on blog posts
18. Customise the right side bar(widget) of the blog post details page
19. Adding menu to WordPress website
20. Create the footer section
21. Secure your WordPress website
22. Deploying your WordPress website to your web host
1. Customizing your WordPress site
WordPress plugins are bits of software that can be uploaded to extend and expand the functionality of your WordPress site. Plugins are basically tools to help us build our website. There are tons of WordPress plugins available for free download from the WordPress.org Plugin Directory. There are also premium or paid WordPress plugins.
Free or Paid Plugins
There are thousands of plugins available for free from the plugin directory which comes with little or no support. Paid plugins usually offer a full-time support staff and developers that work on maintaining the security and compatibility of plugins with the latest version of WordPress as well as with other themes and plugins.
Most of the time, plugins are compatible with the core of WordPress and with other plugins, but sometimes a plugin’s code might affect another plugin, causing compatibility issues. With a paid plugin, it’s just nice to know you have support staff that can help you out if anything goes wrong.
What types of things can plugins do?
Well, there’s probably a plugin for anything you want. All you need to do is take a stroll through the WordPress plugin directory to see all of the possible ways plugins can extend or enhance your WordPress site.
Let's continue with the website design for our demo company briltech created here Create your first website or blog using WordPress
Install Required Plugins
There two methods to install a plugin
Method 1: Installing the plugins when working on your local development environment (localhost)
if you are not logged in, type http://localhost/briltech/wp-login.php, hit the enter key, type your username and password, click on the login button.
1. Download the version of the plugins used for this demo website here download plugins, or you can download the latest version here Wordpress Plugins (Note: there might be slight changes to what we used, which might change some features of our demo website).
Extract the downloaded file to get the plugins folder.

2. Install Page Builder by SiteOrign plugin
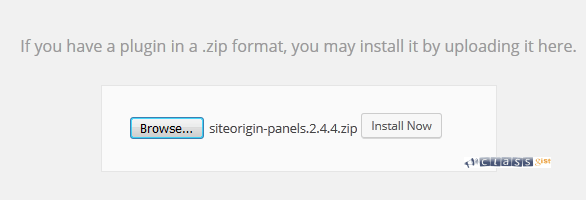
Go to Dashboard > Plugins > Add New, it will take you to the "Add Plugins" Page, click on the "Upload Plugin" button, click the browse button, navigate to where you downloaded the siteorigin-panels.2.4.4.zip file, select it, click the open button and click "Install Now" Button.
On the next page, click on the "Activate Plugin" link, it will take you back to the "Plugins" page.
3. Install Sydney Toolbox plugin
Go to Dashboard > Plugins > Add New, it will take you to the "Add Plugins" Page, click on the "Upload Plugin" button, click the browse button, navigate to where you downloaded the sydney-toolbox.1.01 file, select it, click the open button and click "Install Now" Button.

On the next page, click on the "Activate Plugin" link, it will take you back to the "Plugins" page.
Method 2: Installing the plugin when working online - on a hosted domain (production server)
Go to Dashboard > Appearance > Themes, it will take you to the "Themes" Page, Click on the link "Begin installing plugins",

it will take you to "Install Required Plugins" page, check the checkbox next to plugin, click the "Bulk Actions" drop down, select Install, then click the "Apply" button,

it will take you to a page that displays "All installations have been completed". Now click the link "Return to Required Plugins Installer".

Check the checkbox next to plugin, click the "Bulk Actions" drop down > click Activate, then click apply button, it will take you to a page that displays successfully activated plugin.
Install Other Plugins for the website functionalities
These are the plugins that we will be using to enhance the WordPress website:
Black Studio TinyMCE Widget
Contact Form 7
Easy Facebook Likebox
Recent Posts Widget Extended
SiteOrigin Widgets Bundle
Theme Junkie Custom CSS
Toolset Types by Onthegosystems
Envira Gallery Lite
Installing the plugins when working on your local development environment (localhost)
1. Install Black Studio TinyMCE Widget plugin
Go to Dashboard > Plugins > Add New, it will take you to the "Add Plugins" Page, click on the "Upload Plugin" button, click the browse button, navigate to where you downloaded the black-studio-tinymce-widget.2.2.8.zip file, select it, click the open button and click "Install Now" Button.

On the next page, click on the "Activate Plugin" link, it will take you back to the "Plugins" page.
2. Repeat step 1, to install "Contact Form 7", "Easy Facebook Likebox", "Recent Posts Widget Extended", "SiteOrigin Widgets Bundle", "Theme Junkie Custom CSS", ("Lightbox Plus Colorbox") plugins. When you are done installing these plugins, you "Plugins" page should look like the image below.

How to Install the same plugins if you are working online - on a hosted domain (production server)
To install the first plugin, Go to Plugins > Add New, it will take you to the "Add Plugin" page. Copy "Black Studio TinyMCE Widget" and paste on the search bar, hit enter, on the result that comes up, you will see the "Black Studio TinyMCE Widget", click on the install now button, it will take you to install plugin page, click on the "Activate Plugin" link, it will take you to the "plugins page" and displays the "plugin activated" message.
Installing the "Contact Form 7" plugin
On the same "Plugins" page click on the Add New button, it will take you to the "Add Plugin" page. Repeat the step on how you installed, the "Black Studio TinyMCE Widget" plugin, this time around, search for "Contact Form 7", on the results that comes up, you will see the "Black Studio TinyMCE Widget", click on the install now button, then the "Activate Plugin" link. The steps are same. For the remaining four plugins, just repeat the same steps.
What Is Next?
Step by Step
This tutorial is part of a series that walks you through creating your first website or blog using WordPress.
Next Step - 2. Change the Theme Option Settings
Start from the beginning - Create your first website or blog using WordPress